
Why Most Multi-Agent Systems Fail — And What Actually Works in Practice
Discover the hidden flaws in multi-agent AI and learn practical fixes for coordination, memory, and tool issues.
Introduction
Multi-agent systems are everywhere right now. Instead of relying on a single AI to do it all, these architectures break a task into smaller pieces and delegate each one to a specialized agent — a planner, a researcher, a coder, a summarizer. It’s a modular, collaborative approach that feels intuitive, scalable, and powerful.
And the world is buying into it. The AI agents market was valued at $3.7 billion in 2023 and is projected to skyrocket to $103.6 billion by 2032. That’s a staggering 44.9% annual growth rate — a clear sign that teams of agents are being positioned as the future of intelligent automation.
But there’s a problem: most of these systems quietly fall apart in real-world conditions. They loop endlessly, misuse tools, forget what just happened, or miscommunicate simple instructions. The more agents you add, the worse it gets — unless you design for coordination from the start.
In this article, we’ll walk through the hidden failure modes that plague multi-agent setups and show how to fix them with real-world design patterns, communication strategies, and code examples using frameworks like LangGraph and CrewAI.
The Illusion of Coordination
Multi-agent systems often look impressive in demos. One agent greets the user, another answers a coding question, and a third summarizes a document. It all feels smooth—like a smart team working together behind the scenes. But if you peek under the hood, most of these setups rely on little more than sequential chat handoffs: one agent finishes, then passes the message along.
That might be fine for scripted tasks. But once you move toward real-world applications—research assistants, incident responders, autonomous workflows—things start to break. You need shared memory so agents don’t forget context, tool scoping so they don’t step on each other’s toes, and structured communication so they understand what’s expected.
Here’s the truth: agents aren’t inherently “smart”. They don’t coordinate themselves, track task progress, or remember what happened five steps ago. All of that needs to be explicitly designed into the system. And without those design choices, adding more agents doesn’t make your system more intelligent—it just makes the failure modes harder to debug.
Real-World Failure Modes
Multi-agent systems promise collaboration—but without the right design, they often break in subtle and frustrating ways. Let’s walk through four common failure modes, what they look like in practice, and why they happen.
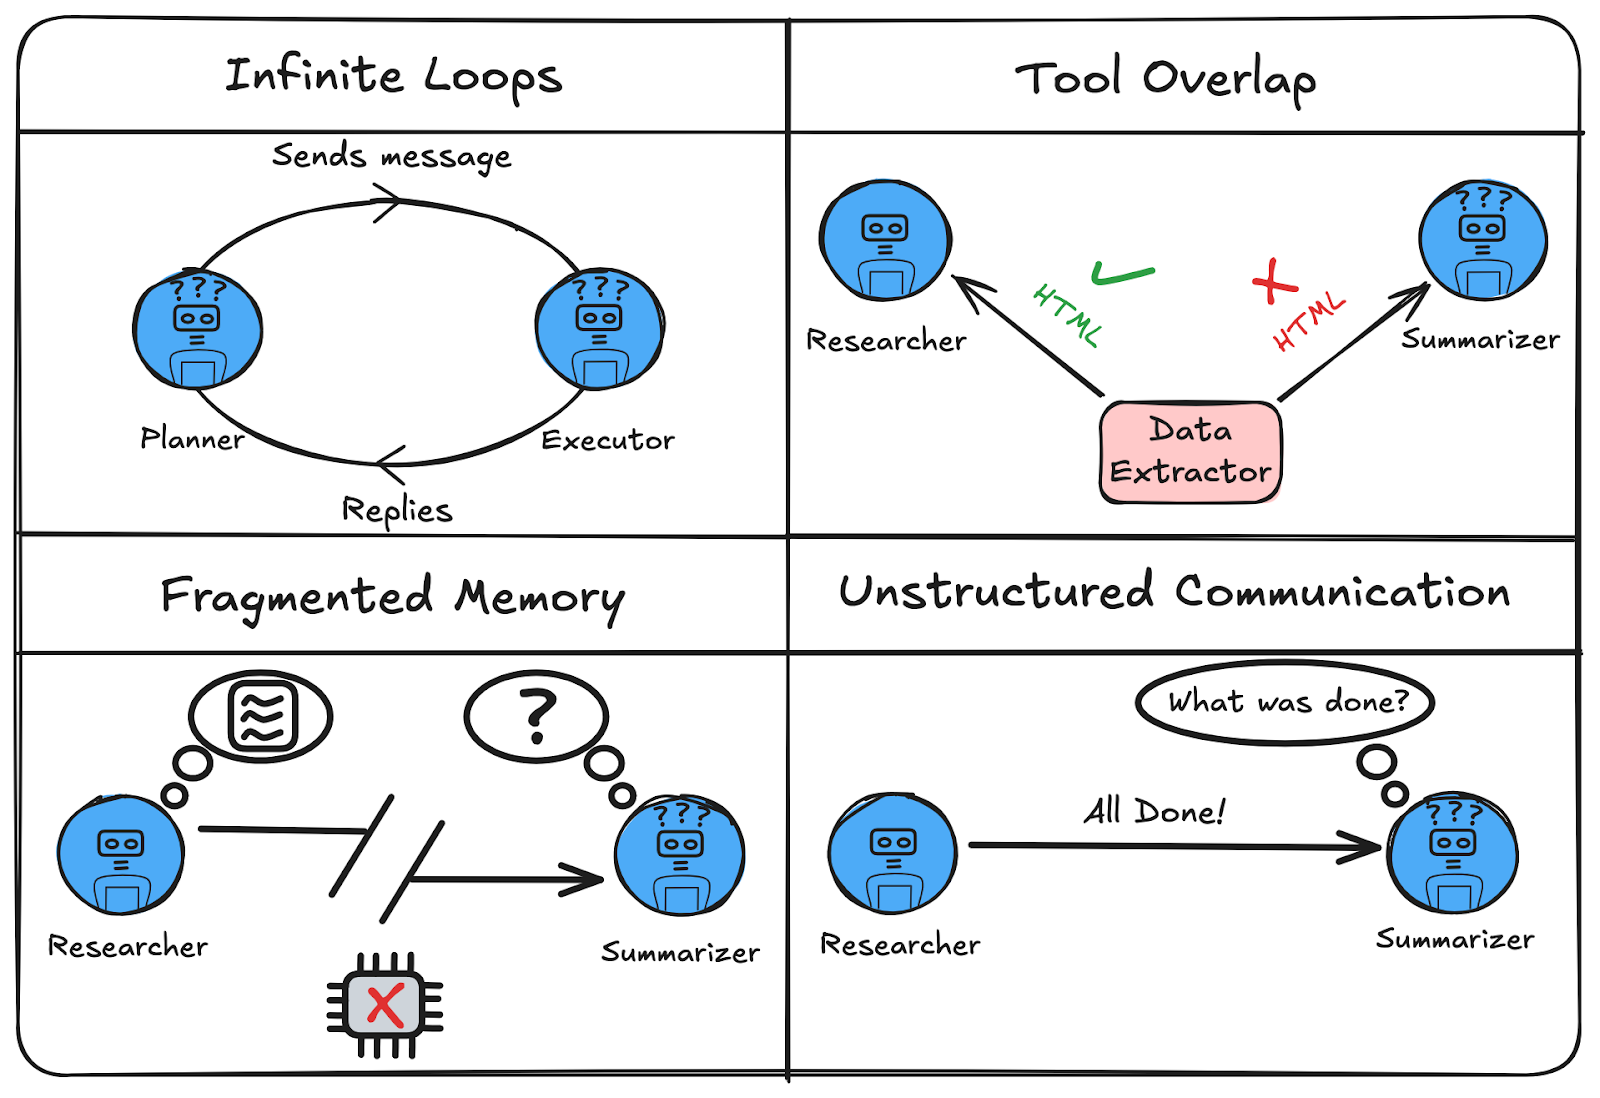
1. Infinite Loops and Recursive Delegation
What it looks like:
A planner sends a task to an executor. The executor replies, “Done — what next?” But the planner, lacking memory or a stop condition, assumes the task is still pending and reassigns it. The loop begins: planner → executor → planner → …
Why it happens:
This is common in network-style architectures using dynamic control flow, where any agent can call any other and the LLM decides the flow. Without shared memory or hop tracking, agents forget past actions and repeat them.
Example:
The planner says, “Summarize this article.” The executor replies, “Summary complete.” The planner, unaware it already assigned the task, re-sends it.
Where it appears most:
- Architecture: Network
- Control flow: Dynamic
- Frameworks: LangGraph (
Commandnodes), LangChain agent chains
2 Tool Overlap and Misuse
What it looks like:
Two agents use the same tool — say, a document retriever — but expect different outputs. One expects raw HTML, the other expects clean markdown. The results become inconsistent or break downstream workflows.
Why it happens:
This often occurs in shared-tool setups, especially with dynamic network architectures. Agents call tools freely without role-based isolation or agreed input/output expectations.
Example:
A researcher and summarizer both call get_text_from_url(). The researcher wants raw HTML for metadata. The summarizer expects formatted text. The tool returns HTML, which the summarizer can’t handle.
Where it appears most:
- Architecture: Network or loosely scoped Supervisor
- Control flow: Dynamic
- Frameworks: LangChain, LangGraph, CrewAI (if tools are global)
3. Fragmented Memory and Blind Agents
What it looks like:
Agent A performs a task—like researching an article. Later, Agent B is asked to summarize the findings but has no idea what Agent A discovered. The result? Incomplete or inaccurate output that feels disconnected.
Why it happens:
This happens when each agent maintains its own isolated memory buffer or prompt history. Without a shared state or centralized memory, agents can’t build on each other’s work—and end up working in silos.
Example:
Agent A extracts key findings from a paper. Agent B receives no context—just a vague “summarize the research.” With no access to Agent A’s output, it produces a generic or wrong summary.
Where it appears most:
- Architecture: Any (Network, Supervisor)
- Control flow: Dynamic
- Frameworks: LangGraph, LangChain (without memory injection)
4. Unstructured Communication
What it looks like:
An agent finishes its task and responds with something like “All done” or “Task complete.” The next agent is triggered but doesn’t know what was completed, what data is available, or what step comes next—so it stalls, loops, or misfires.
Why it happens:
This failure is common in LLM-driven systems that rely on free-form natural language between agents. Without a structured message format—like a JSON schema or protocol—the intent of the response is ambiguous, and downstream agents can’t reliably extract what they need.
Example:
Agent A completes an analysis and replies: “Report ready.” Agent B is expecting a payload like {report_text: "...", next_action: "summarize"}. With no structured data to act on, it either does nothing or starts over.
Where it appears most:
- Architecture: Any
- Control flow: Dynamic
- Frameworks: LangGraph, LangChain, CrewAI (without structured message wrappers)
What Actually Works
Each of the following design fixes maps directly to the issues discussed earlier — in the same order. These aren’t just best practices; they’re the patterns that actually hold up when agent systems hit production.
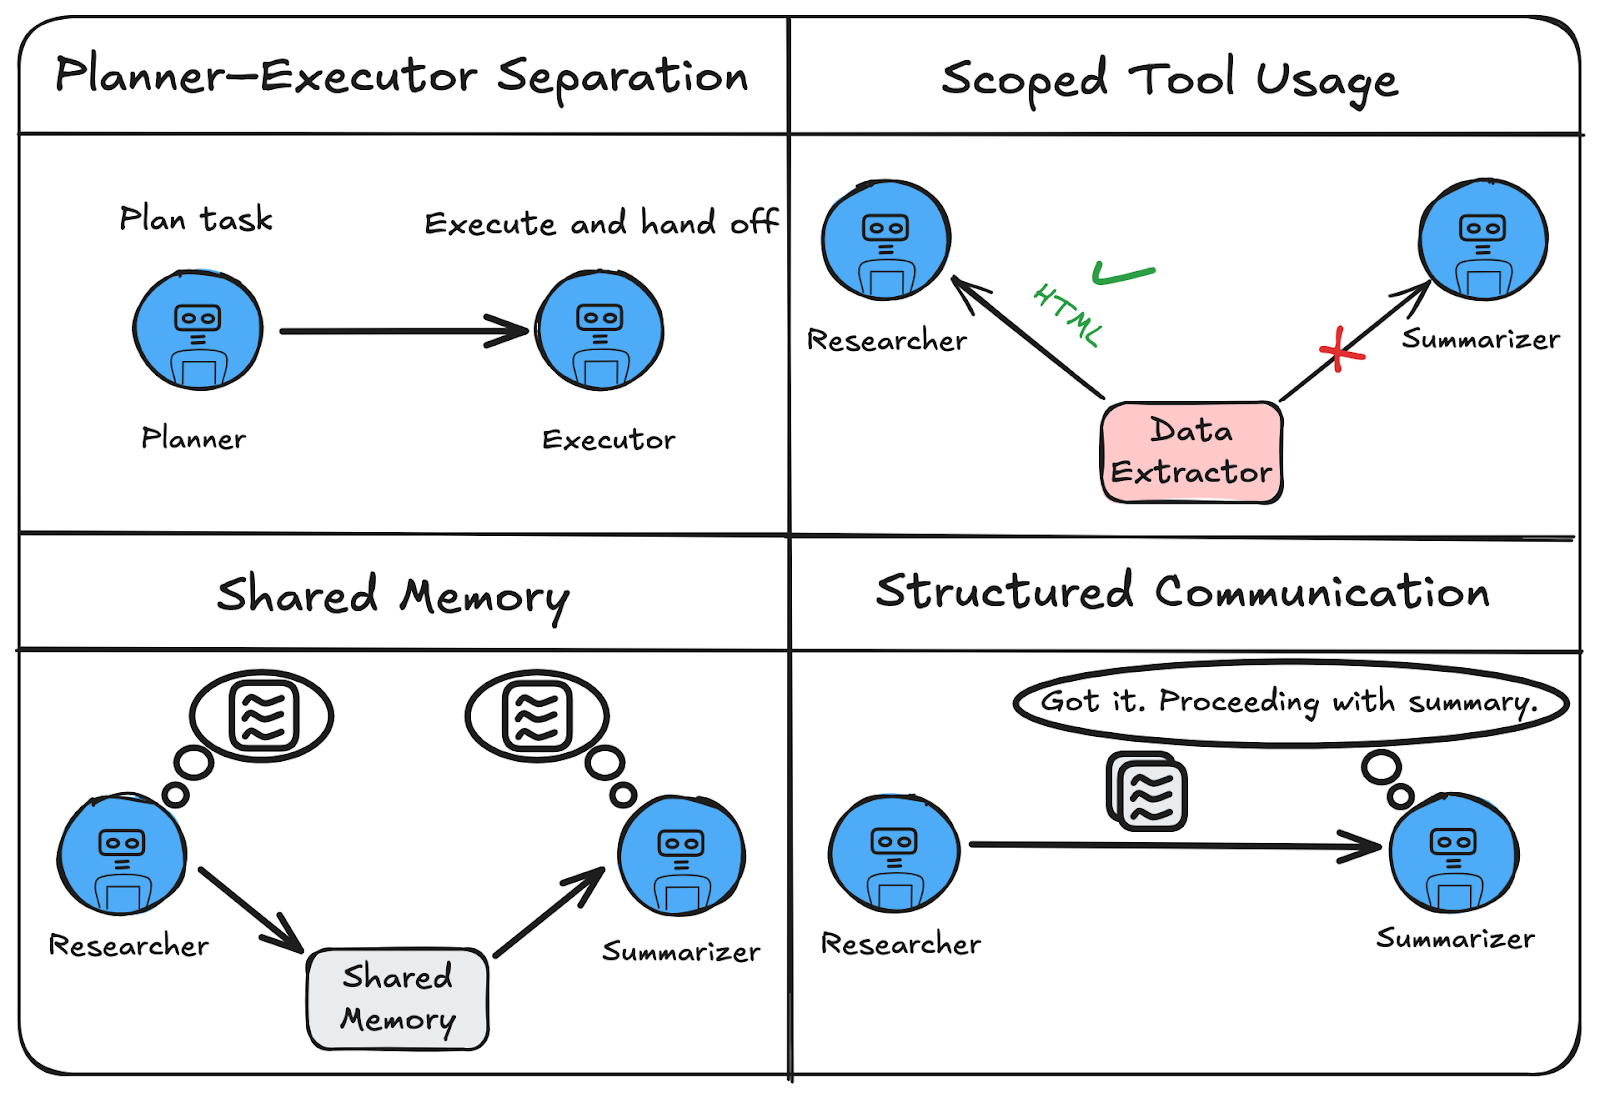
1. Planner–Executor Model with Feedback
In practice, a clean Planner–Executor–Evaluator model prevents uncontrolled back-and-forth by assigning distinct responsibilities.
The Planner breaks a high-level goal into concrete steps. The Executor performs these steps without looping back for further instructions. The Evaluator monitors the outcome and sends a clear signal: continue, retry, or stop. This creates a structured loop with exit criteria and eliminates recursive delegation.
Critically, each agent only talks to the next in line — no circular calls, no ambiguity about who does what. The Evaluator acts as a gatekeeper, preventing the Planner from re-engaging unless necessary.
This architecture works well in LangGraph using explicit control flow:
- The Planner passes to the Executor
- The Executor passes to the Evaluator
- The Evaluator decides the next step
By isolating roles and enforcing linear flow, you avoid infinite loops and make your system more reliable and debuggable, even as the number of agents grows.
2. Role-Based Agent Design
Multi-agent systems often fail when agents share tools or memory without boundaries. Role-based design solves this by assigning each agent a specific job — like planner, researcher, summarizer, or critic — and restricting their access accordingly.
For example, only the Researcher should use a web search tool. Only the Summarizer should call the summarization API. If both use the same tool with different expectations (e.g. HTML vs Markdown), chaos follows.
Same goes for memory: let each agent write only to relevant sections or use shared memory intentionally with scoped access.
In LangGraph or CrewAI, this is implemented by:
- Assigning tools per role
- Limiting memory writes/reads per agent
- Enforcing clean I/O contracts between agents
This structure ensures clarity, prevents tool misuse, and keeps agents from stepping on each other’s toes, especially in dynamic or loosely-coupled architectures.
3. Centralized Memory or Shared State
A common failure in multi-agent systems is fragmented memory — where agents operate in isolation and can’t access each other’s context. This leads to blind delegation, repeated work, or missed handoffs.
The fix is to establish centralized memory or a shared state hub that all agents can access — intentionally and with boundaries. Instead of each agent storing its own memory, a common graph state (e.g. in LangGraph) allows agents to write results, read what others did, and coordinate actions.
For example, the Researcher writes findings to shared state; the Summarizer then reads those findings directly — no guessing, no confusion.
In LangGraph, this is implemented via:
- A shared state object passed between nodes
- Controlled read/write access per agent
- Optional memory isolation for sensitive data
With this structure, agents remain informed without being overloaded, enabling smoother collaboration and reducing task failure due to context loss.
4. Communication Protocols
Multi-agent failures often stem from vague, unstructured messages — like an agent saying “Done” without context. Without knowing what was done or what to do next, the receiving agent stalls or guesses.
The fix? Use structured message schemas that define exactly what each message should contain: an action, a payload, and an optional next step.
For example, instead of "Done", send:
{
"action": "summarize",
"payload": "Text from research agent",
"next": "critic"
}
The receiver can now reliably parse and act on the message. It knows what to do, with what, and where to route it next.
In LangGraph, this can be enforced by standardizing the state format and building clear expectations into each node. Structured communication avoids ambiguity, prevents dropped tasks, and supports robust delegation — especially as your agent graph grows.
Real-World Use Case — Putting the Fixes into Action
In this section, we’ll bring everything together into a complete, working example. We’ll simulate a real-world cybersecurity incident using fake but realistic log data and build a multi-agent system using LangGraph to analyze and respond to it. Each agent will take on a specific role—Detector, Investigator, Fixer, and Reporter—and together, they will demonstrate all four of the fixes we discussed earlier: scoped planner–executor roles, centralized memory, clear communication, and functional agent design. By the end, you'll have a complete pipeline that turns raw log data into a structured incident report using LLM-powered agents.
Step 1: Install libraries
We begin by installing the necessary dependencies:
pip install langgraph langchain-google-genai google-generativeai
This installs:
langgraphfor building and executing the agent graph.langchain-google-genaiandgoogle-generativeaito use Gemini models as your agent brains.
Step 2: Import necessary modules
We then import the required tools for defining agent state, commands, and messaging.
from langgraph.graph import StateGraph, MessagesState, START, END
from langgraph.types import Command
from typing import TypedDict, List, Optional, Literal
from langchain_google_genai import ChatGoogleGenerativeAI
These are used to define:
- Agent memory (
MessagesState) - The state flow between nodes (
Command) - Typed dictionary for storing incident data (
IncidentState)
Step 3: Prepare sample logs and initialize the model
We simulate realistic system log entries that include login attempts, file access, and deletions—enough to suggest a possible breach.
sample_logs = [
    "2025-07-10 09:02:31 | login_success | user=admin | ip=192.168.0.5",
    "2025-07-10 09:04:55 | login_failed  | user=admin | ip=203.0.113.42",
    "2025-07-10 09:05:10 | login_failed  | user=admin | ip=203.0.113.42",
    "2025-07-10 09:05:25 | login_failed  | user=admin | ip=203.0.113.42",
    "2025-07-10 09:06:01 | login_success | user=john  | ip=192.168.0.20",
    "2025-07-10 09:07:12 | file_access   | user=admin | file=/etc/passwd | ip=203.0.113.42",
    "2025-07-10 09:08:30 | login_success | user=admin | ip=203.0.113.42",
    "2025-07-10 09:09:01 | file_delete   | user=admin | file=/var/log/auth.log | ip=203.0.113.42",
    "2025-07-10 09:12:47 | login_failed  | user=root  | ip=198.51.100.23",
    "2025-07-10 09:13:02 | login_failed  | user=root  | ip=198.51.100.23"
]
Then we initialize a lightweight Gemini model:
model = ChatGoogleGenerativeAI(model="gemini-1.5-flash", google_api_key="YOUR_API_KEY_HERE")
Using gemini-1.5-flash gives us fast, cost-effective responses suitable for multi-agent tasks.
Step 4: Detect suspicious activity (Detector Agent)
The Detector Agent analyzes all log entries and flags anything suspicious.
def detector(state: MessagesState) -> Command[Literal["investigator"]]:
    logs = state.get("sample_logs", [])

    prompt = (
        "You are a cybersecurity detector.\n"
        "Analyze the following system logs and identify any suspicious or malicious activities.\n"
        "Explain your reasoning briefly. Output should be a list of suspicious events with timestamps and reasons.\n\n"
        + "\n".join(logs)
    )

    response = model.invoke(prompt)

    return Command(
        goto="investigator",
        update={"messages": [response], "suspicious_logs": response.content}
    )
How it demonstrates fix 1 (Planner–Executor Model with Feedback)
- Planner–Executor separation: The system (you) provides a predefined plan — analyze logs and identify suspicious entries. The Detector acts as the executor, simply carrying out that step. It doesn’t try to replan or loop back.
- No recursive back-and-forth: The Detector doesn’t reconsult any upstream agent. It just does its job (analyze logs) and passes the result forward. This avoids agent loops or confusion.
- Linear and debuggable: The flow is:
1. Logs injected
2. Detector analyzes
3. Writes the result to shared memory (suspicious_logs)
4. Passes control to the next step (Investigator) - Built-in termination: Downstream (e.g. the Evaluator agent) will eventually decide whether to continue or stop — not the Detector. That enforces a clear control boundary.
Step 5: Analyze the threat (Investigator Agent)
The Investigator Agent digs into the suspicious logs and provides a detailed interpretation of what might have happened—e.g., brute-force attempts, compromised credentials, etc.
def investigator(state: MessagesState) -> Command[Literal["fixer"]]:
    suspicious_logs = state.get("suspicious_logs", "")

    prompt = (
        "You are a cybersecurity investigator.\n"
        "Based on the suspicious logs below, investigate the potential source and nature of the incident.\n"
        "Include what might have caused it, what systems might be affected, and whether this was a brute-force, privilege escalation, or data tampering attempt.\n\n"
        f"{suspicious_logs}"
    )

    response = model.invoke(prompt)

    return Command(
        goto="fixer",
        update={"messages": [response], "incident_analysis": response.content}
    )
How it demonstrates fix 2 (Role-Based Design)
- Clear Role: Only investigates — doesn’t detect or fix.
- Scoped Input: Reads
suspicious_logsfrom state (not full logs). - Scoped Output: Writes
incident_analysis— not generic messages or memory. - No Tool/Memory Overlap: Doesn’t modify or reprocess earlier inputs.
Step 6: Apply remediation (Fixer Agent)
The Fixer Agent suggests practical remediation steps based on the investigation findings.
def fixer(state: MessagesState) -> Command[Literal["reporter"]]:
    incident = state.get("incident_analysis", "")

    prompt = (
        "You are a cybersecurity fixer.\n"
        "Based on the following incident analysis, suggest practical remediation steps and any urgent actions to contain or prevent further damage.\n"
        "List concrete actions (e.g., block IPs, reset credentials, check audit logs, etc.)\n\n"
        f"{incident}"
    )

    response = model.invoke(prompt)

    return Command(
        goto="reporter",
        update={"messages": [response], "remediation_steps": response.content}
    )
How it demonstrates fix 3 (Centralized Memory)
- Reads shared memory (
incident_analysis)from the global state. - Writes back a new scoped update (
remediation_steps) to the shared state. - Doesn’t interfere with
sample_logs,suspicious_logs, or any other agent’s data. - Avoids overwriting any part of memory it doesn’t own.
Step 7: Generate the incident report (Reporter Agent)
The Reporter Agent compiles everything—suspicious events, findings, and fixes—into a well-formatted incident report.
def reporter(state: MessagesState) -> Command[Literal[END]]:
    suspicious = state.get("suspicious_logs", "")
    analysis = state.get("incident_analysis", "")
    remediation = state.get("remediation_steps", "")

    prompt = (
        "You are a cybersecurity incident reporter.\n"
        "Using the following inputs, create a well-structured incident report with clearly labeled sections:\n\n"
        "1. **Suspicious Logs**\n"
        f"{suspicious}\n\n"
        "2. **Incident Analysis**\n"
        f"{analysis}\n\n"
        "3. **Remediation Steps**\n"
        f"{remediation}\n\n"
        "Ensure clarity and use markdown formatting where appropriate."
    )

    response = model.invoke(prompt)

    return Command(
        goto=END,
        update={"messages": [response], "incident_report": response.content}
    )
How it demonstrates fix 4 (Structured Communication Protocols)
- Uses a clearly defined output format (structured sections).
- Reads from multiple memory slices and aggregates them into a unified schema.
- The prompt acts like a message schema, enforcing consistent structure and downstream interpretability (even if not passed to another agent).
Step 8: Build and run the LangGraph
We define the full LangGraph:
graph = StateGraph(IncidentState)

graph.add_node("detector", detector)
graph.add_node("investigator", investigator)
graph.add_node("fixer", fixer)
graph.add_node("reporter", reporter)

graph.add_edge(START, "detector")
graph.add_edge("detector", "investigator")
graph.add_edge("investigator", "fixer")
graph.add_edge("fixer", "reporter")
graph.add_edge("reporter", END)
We then compile and run it:
incident_graph = graph.compile()

initial_state = {
    "sample_logs": sample_logs,
    "messages": []
}

result = incident_graph.invoke(initial_state)
Finally, we print the structured incident report:
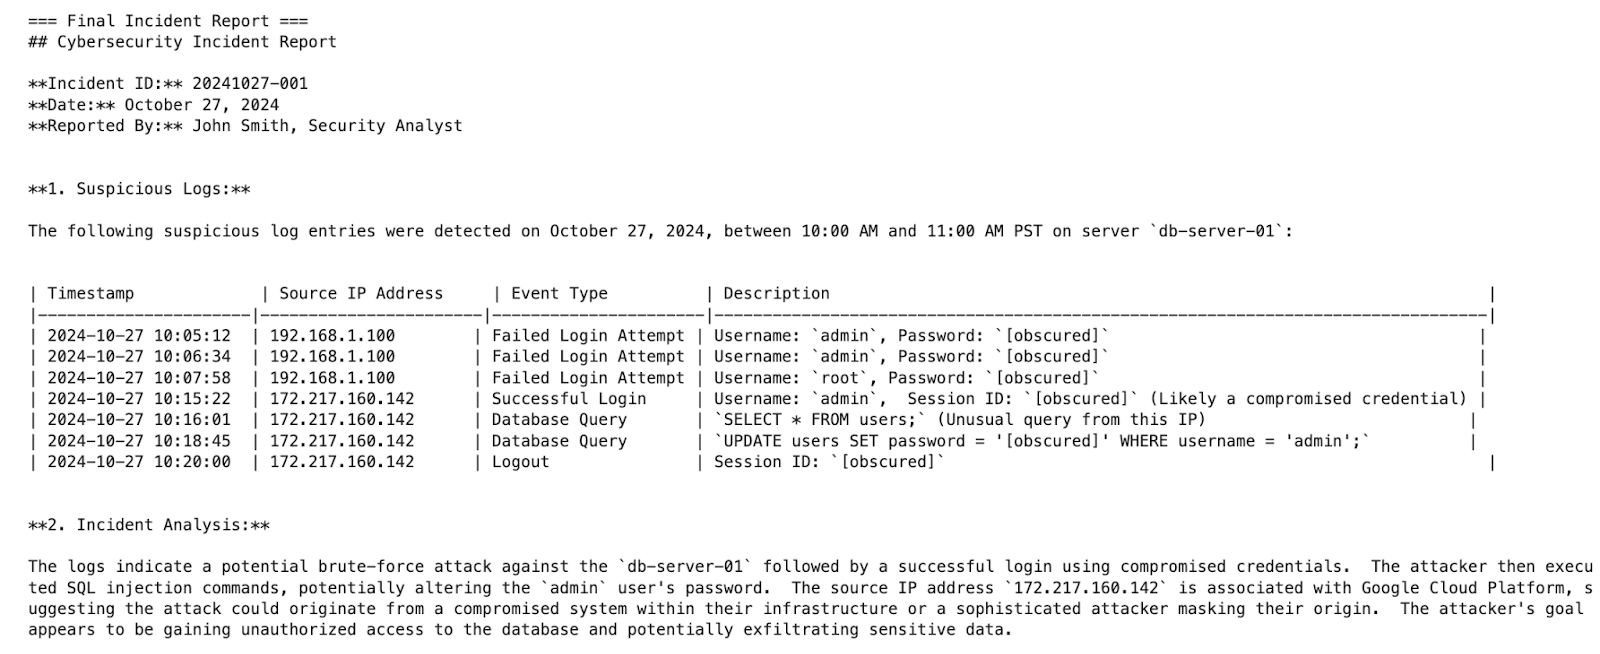
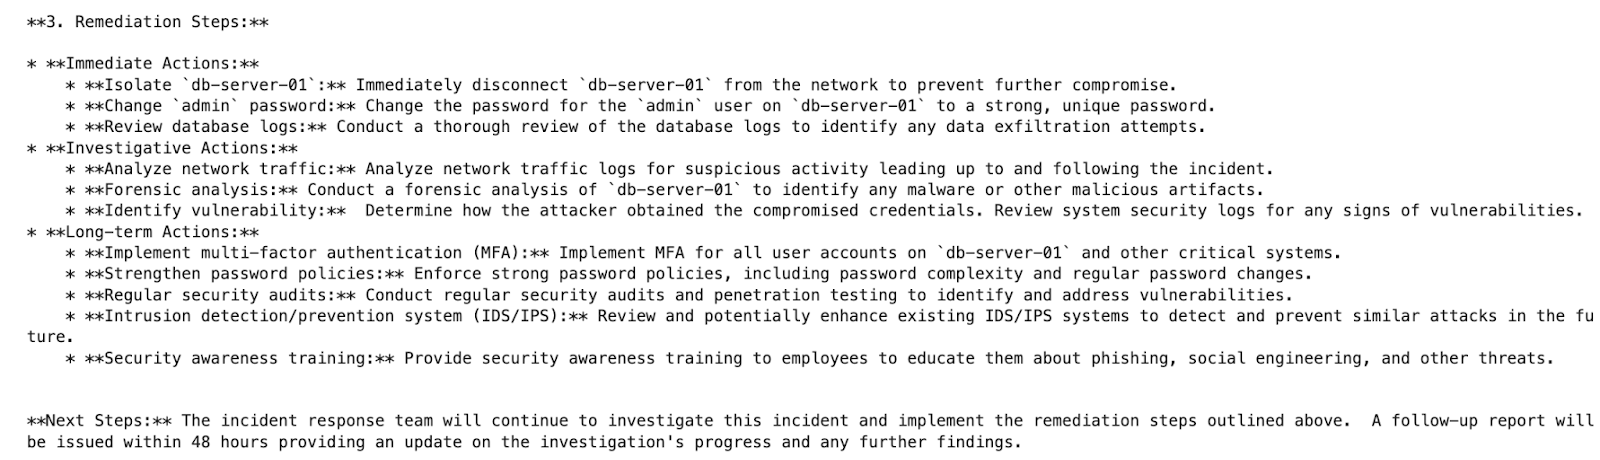
print("\n=== Final Incident Report ===")
print(result.get("incident_report", "No report generated."))
Here’s what the output should look like:
And that’s it! You now have a fully working multi-agent cybersecurity incident handler, built with LangGraph and powered by Gemini. Each agent plays a focused role, uses shared memory responsibly, and contributes structured outputs — perfectly demonstrating how to fix common failure modes in multi-agent systems.
Key Takeaways
This tutorial went beyond just building agents — it showed how to make them work together. We simulated a realistic cybersecurity incident with four distinct agents using LangGraph, each demonstrating one of the core architectural fixes that address common failure modes in multi-agent systems.
Here’s what we learned:
- LLMs aren’t the problem — coordination is. Most failures happen not because the language model is weak, but because agents talk over each other, forget what’s happening, or get stuck in loops. Clear roles, scoped memory, and linear flows prevent that.
- Stateful graphs make agent systems manageable. LangGraph's design lets you visualize and control the flow of information between agents. That makes debugging easier and builds confidence that each agent is doing its job — and only its job.
- Planner–executor models keep things simple. Separating planning from execution makes agents easier to test and reason about. It also reduces hallucinations and avoids recursive loops.
- Role-based design and scoped memory are non-negotiable. Without these constraints, agents quickly become chaotic or redundant. The success of our simulation hinged on enforcing these boundaries.
- Even a basic example can reflect real-world architecture. With just over a hundred lines of code, we touched on ideas relevant to production systems: threat detection pipelines, automated remediation, and structured incident reporting.
Looking ahead, multi-agent systems are evolving rapidly. Trends like persistent agents, decentralized memory, and Agent Operating Systems (AgentOS) are already emerging. But regardless of what tools or platforms you use, the foundational principles in this tutorial will still apply.
Fix the architecture first and the intelligence will follow.


.png)